Call Us Today!
(647) 994 4698That musty basement smell or the sight of a damp spot creeping across the wall is more than just a nuisance—it’s a clear signal your home is in distress. When it comes to leaky foundation repair, the first and most critical step is figuring out why it's happening. Here in the Greater Toronto Area, the answer often lies right in the ground your house is built on. Our unique soil and volatile weather create the perfect storm for foundation problems.
Finding a leak in your foundation is unnerving, but trust me, it’s a surprisingly common headache for homeowners all over the GTA. The cause is rarely a single, simple thing. It's usually a combination of environmental factors constantly working against your home’s structure.
Getting a handle on these local challenges is the key to finding a real, long-term fix. Instead of just slapping a patch on a crack, you can start tackling the forces that created it in the first place. This is what helps you tell the difference between a bit of minor dampness and the first warning sign of a serious structural issue, letting you step in before a small problem balloons into a costly disaster.
A huge portion of the Greater Toronto Area sits on a foundation of clay-based soil. Think of this soil like a giant, powerful sponge. When it gets soaked from heavy rain or snowmelt, it swells up dramatically. Then, during a dry summer spell, it shrinks and pulls away from your foundation. This endless cycle of expanding and contracting puts an incredible amount of stress on your foundation walls.
As the soil swells, it exerts immense pressure, pushing inward. When it shrinks, it leaves voids. Over years, this constant push-and-pull movement is enough to form cracks in the concrete. What starts as a tiny, hairline crack can quickly become a major pathway for water. This isn't just a Toronto problem, either; soil type is a huge factor in foundation issues worldwide. For example, many foundation problems in California are linked to similar soft clay soils that expand and contract with the seasons. You can find more insights on these kinds of foundation challenges at weinsteinconstruction.com.
Key Takeaway: The shrink-swell cycle of Toronto's clay soil is a primary culprit behind many foundation cracks. This relentless movement weakens concrete over time, creating entry points for water.
Hydrostatic pressure is just a technical term for the force of water building up in the soil right next to your foundation. After a heavy downpour or a fast spring thaw—both staples of Toronto's climate—the ground can become completely saturated. When this happens, the water table rises, and all that water starts pushing against your basement walls and floor with surprising force.
This pressure can easily force water through the smallest, pre-existing cracks in your foundation. It can also make existing cracks worse or even create new ones. A well-functioning weeping tile system is supposed to relieve this pressure by channelling groundwater away from your home, but older, damaged, or clogged systems often can't keep up with the demand.
Beyond our tricky soil and intense water pressure, several other common issues can lead to a leaky foundation in the GTA:
Before you can even think about leaky foundation repair, you need to put on your detective hat. Finding the exact source of the water is the most critical first step because it dictates the entire repair strategy. Get this wrong, and you could end up with a costly fix that doesn't actually solve the problem.
It all starts with a thorough visual inspection, both inside and out. Grab a good flashlight and get ready to document everything you find. This initial legwork will give you a much clearer picture of what you're up against and help you explain the situation to a pro if you decide to call one.
Your investigation should always begin outside. The mission here is to spot anything that might be funnelling water toward your foundation. One of the best times to do this is right after a heavy rain—it’s like seeing the problem in real-time as water flows around your property.
Keep a sharp eye on these key areas:
Now it’s time to head down into the basement or crawl space. This is where the clues are usually the most obvious. With your flashlight, meticulously inspect the foundation walls, paying close attention to the corners and where the walls meet the floor.
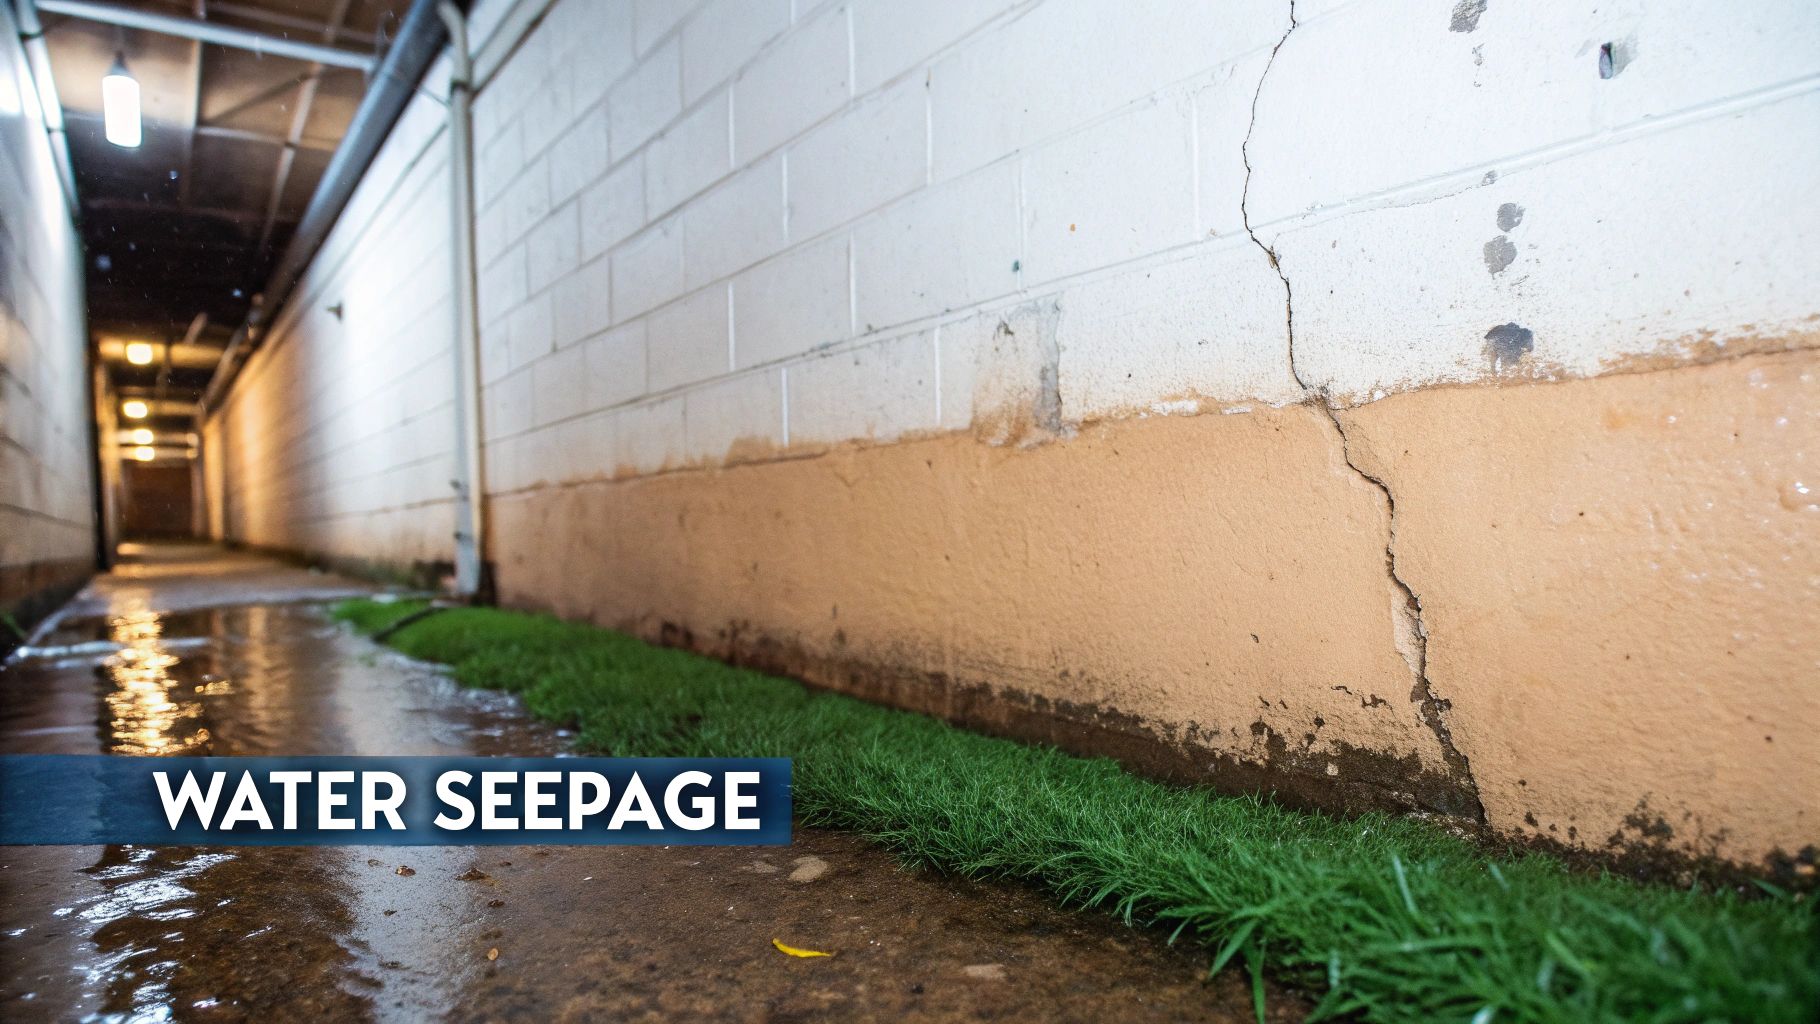
A dead giveaway is efflorescence—that chalky, white powder left behind when water evaporates. It’s a mineral trail that literally points to where moisture has been coming through. You might also spot dark, damp stains, peeling paint, or even small puddles if the leak is active.
Remember, the spot where you see water dripping inside isn't always the entry point. Water can travel along the top of a foundation wall for several feet before it finally finds a place to drip down.
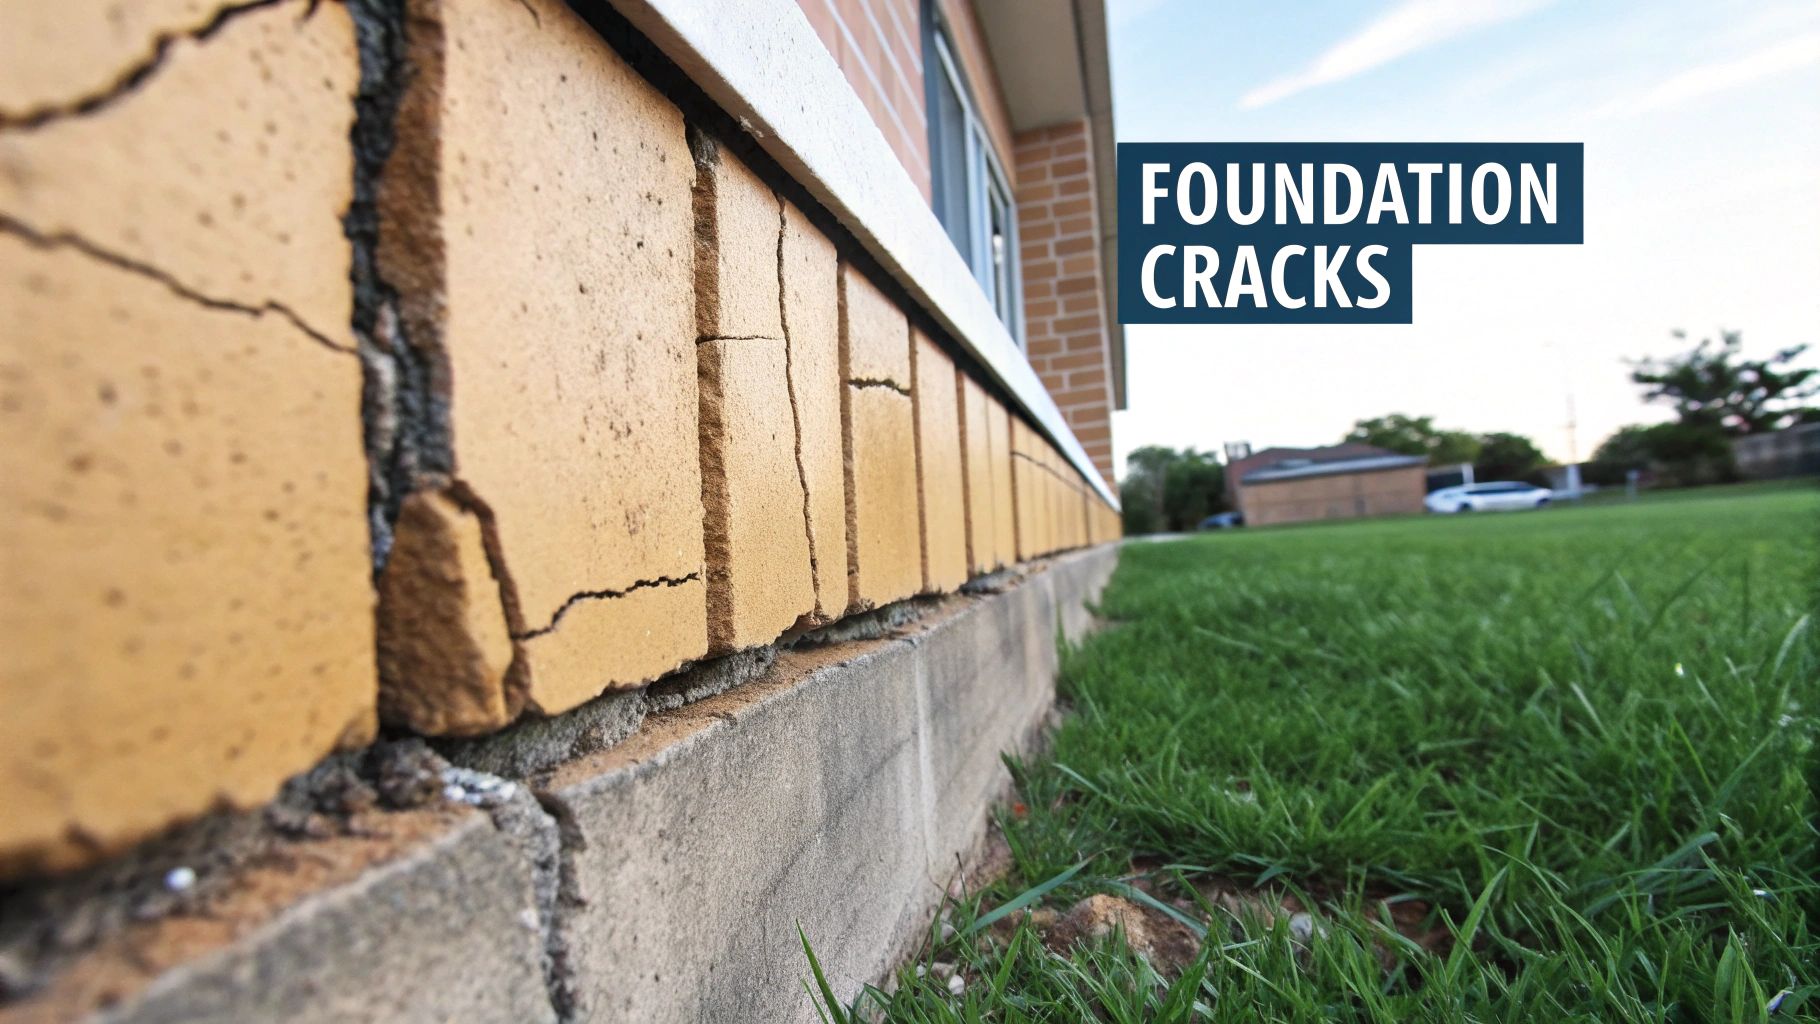
Not all cracks are created equal, and knowing the difference is crucial for figuring out how urgently you need to act. Most fall into a few common categories, and understanding them provides major insight. For a more detailed breakdown, our guide on how to fix foundation cracks is a great resource.
Use this quick-reference guide to diagnose the likely source of your foundation leak based on the symptoms you're seeing in your home.
| Symptom You See | What It Likely Means | Level of Concern |
|---|---|---|
| Thin vertical or diagonal cracks, less than 3 mm wide. | These are often harmless shrinkage cracks that form as concrete cures. | Low. Monitor for changes, but they are not usually structural. |
| Cracks that are wider at the top than the bottom. | This can indicate foundation settling, where one part of the home is sinking more than another. | Medium. This warrants a professional assessment. |
| Horizontal cracks in the foundation wall. | This is a serious sign of external pressure, likely from soil and water, causing the wall to bow inward. | High. This is a structural issue that requires immediate professional attention. |
| "Stair-step" cracks in concrete block or brick foundations. | These cracks follow the mortar joints and often suggest settling or soil pressure. | Medium to High. The severity depends on the width and if the wall is bulging. |
Taking photos and jotting down notes of everything you find will be incredibly helpful. By systematically checking the outside and inside of your home, you’ll piece together the story of your leak. This groundwork ensures that when it’s time for the repair, you’re tackling the root cause, not just mopping up a symptom.
So you’ve found a leak. Now for the big question: do you fix it from the inside or the outside? When it comes to foundation repair, there’s no single right answer. It’s a classic debate between tackling the problem from within or creating a fortress-like barrier on the exterior.
Each strategy comes with its own pros, cons, and price tag, and the best choice really depends on the type of problem you're facing.
Getting this decision right is everything. An interior fix might be perfect for a single, isolated crack, but if you're dealing with widespread dampness, you'll likely need a more heavy-duty exterior solution. Choose wrong, and you could be right back where you started in a year or two.
This visual guide can help you map out the decision-making process. It shows how the scale of the problem often points you toward either a DIY-friendly fix or a job for the pros.
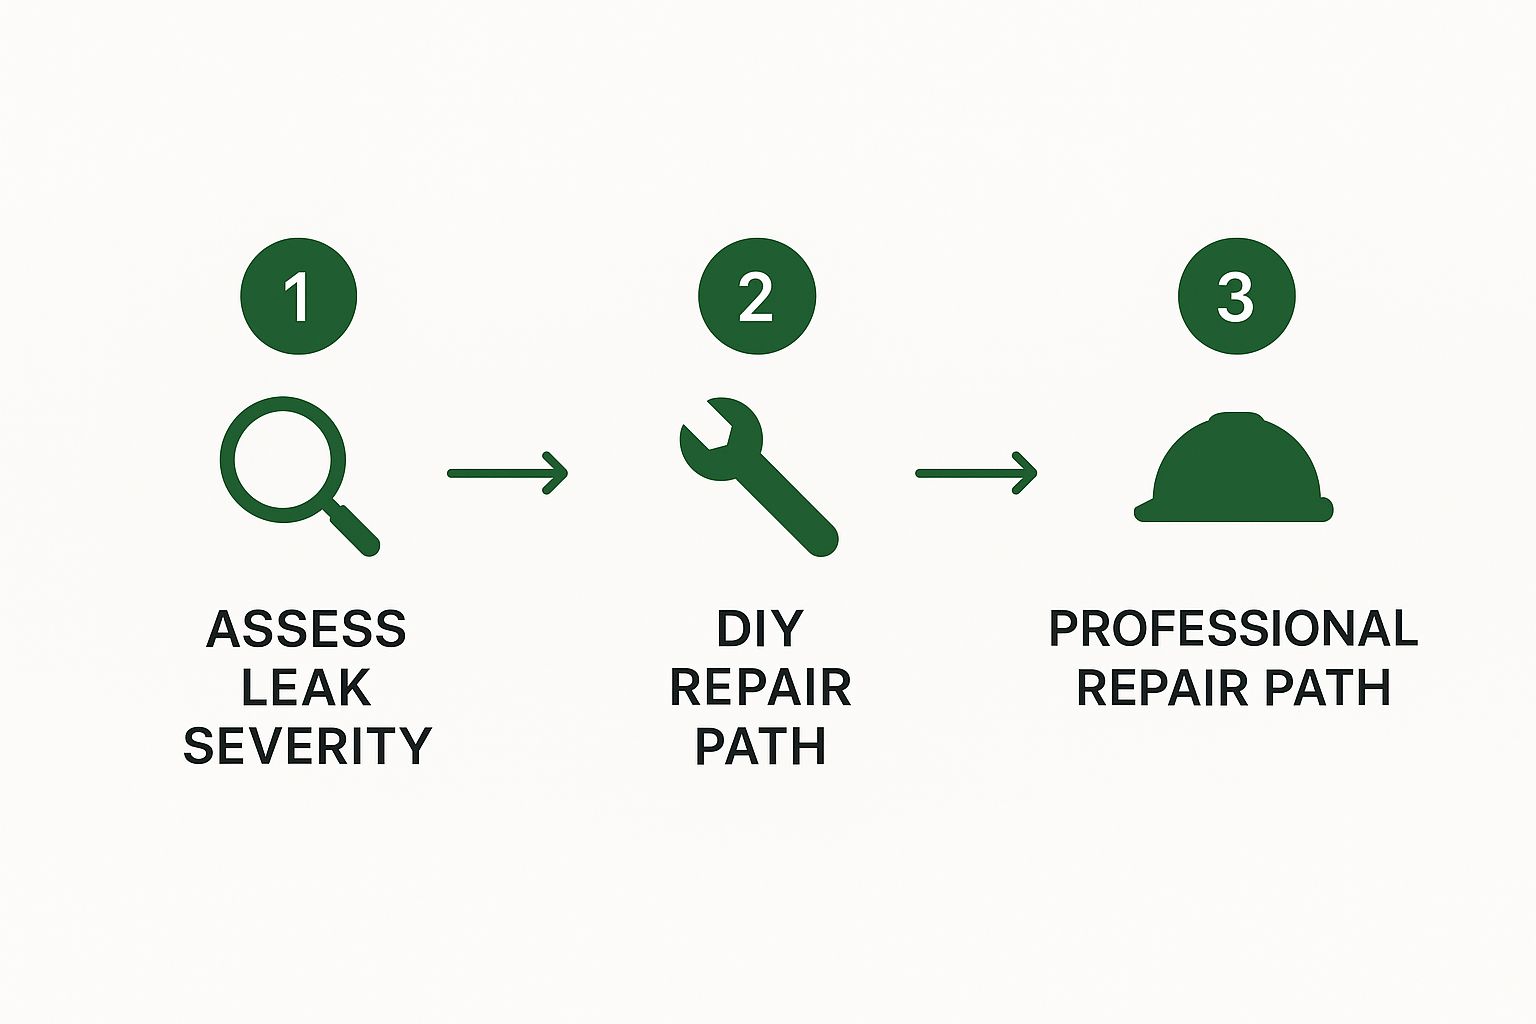
As you can see, the severity of the leak is the number one factor. It’s what guides you toward a contained internal repair or a comprehensive external waterproofing system.
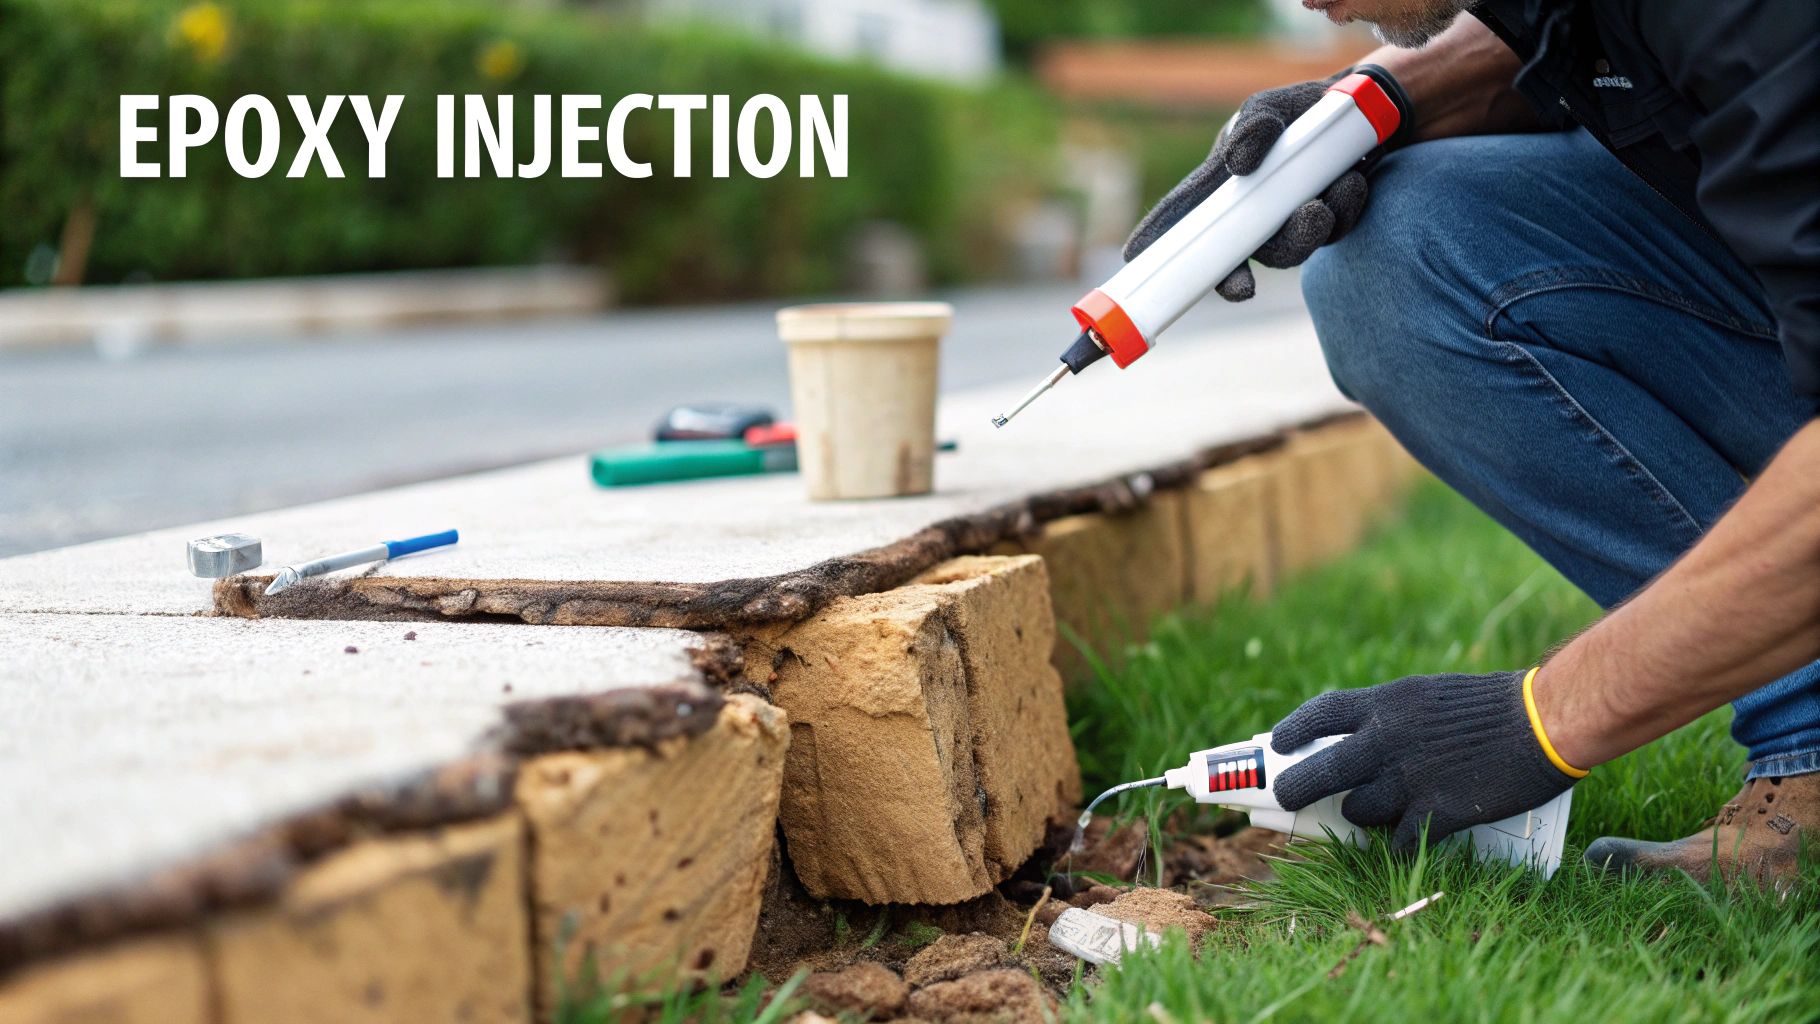
Interior methods are all about stopping water after it’s already made its way through the concrete but before it gets into your basement. The good news is that these solutions are usually less disruptive and easier on the wallet than digging up your yard.
The most common tactic here is crack injection, where we inject either epoxy or polyurethane foam straight into the problem crack.
Another popular interior solution is building an internal drainage system. This involves installing a weeping tile system under your basement floor. It’s designed to collect any water that seeps through the walls and channel it to a sump pump, which then safely pumps it away from your house.
Expert Insight: An internal drainage system doesn't actually stop water from entering the wall; it just gives it a controlled way out. This makes it a fantastic solution for managing widespread, low-level dampness where digging up the entire foundation isn’t practical.
For a truly permanent fix, nothing beats exterior waterproofing. This approach tackles the problem at the source, creating a barrier that prevents water from ever even touching your foundation walls. It’s the most thorough solution, but it’s also a major undertaking that requires significant excavation.
The process starts by digging a trench all the way around your foundation, right down to the footings. Once the wall is exposed, it gets a deep clean, and we repair any cracks. Then, a waterproof membrane—usually a thick, rubberized asphalt coating—is applied to the entire wall.
This creates an impenetrable shield. To finish the job, a brand-new weeping tile system is installed at the base, surrounded by gravel. This system collects groundwater and drains it away, relieving the hydrostatic pressure that was causing the leaks in the first place.
Choosing between an interior and exterior waterproofing and foundation repair in Toronto usually boils down to the specific issue, your budget, and what you’re hoping to achieve long-term.
Here’s a quick breakdown to help you weigh your options:
| Factor | Interior Repair (e.g., Injections) | Exterior Repair (e.g., Excavation) |
|---|---|---|
| Best For | Isolated, non-structural cracks with a clear entry point. | Widespread moisture, multiple leaks, and relieving hydrostatic pressure. |
| Cost | Lower upfront cost, typically priced per crack. | Higher cost due to labour-intensive excavation and materials. |
| Disruption | Minimal disruption, contained within the basement. | Major disruption to landscaping, decks, and patios. |
| Effectiveness | Highly effective for sealing specific leaks. | Provides a complete and permanent waterproofing barrier. |
| Timeline | Can often be completed in a few hours. | A multi-day project, typically taking 3-5 days. |
Ultimately, if you’re dealing with a single, pesky crack, a quick and affordable interior injection is often the perfect fix. But if you’re seeing persistent dampness on your basement walls or have water coming in from multiple spots, an exterior waterproofing system is the definitive solution to protect your home for decades to come.
We've all been there. You spot a crack in the foundation, and the first thought is, "I can fix that." A quick trip to the hardware store for a tube of sealant seems like a simple, money-saving solution. That can-do spirit is great, but when it comes to leaky foundation repair, knowing where to draw the line between a weekend project and a job for a professional is absolutely critical.
Getting it wrong can turn a small leak into a structural catastrophe. A botched repair on a serious crack doesn't just fail to stop the water; it can mask deeper issues, allowing damage to worsen behind the scenes and even compromise your home's stability. Understanding what you can realistically handle versus what needs an expert eye is the key to protecting your biggest investment.
Not every damp spot warrants an emergency call to a contractor. In fact, some of the most effective fixes are preventative tasks that any confident homeowner can tackle. These jobs usually deal with the causes of water buildup, not complex structural failures.
You're likely in safe DIY territory if you're dealing with things like:
While DIY is great for maintenance, some symptoms are undeniable signals that you're out of your depth. Attempting an amateur repair on these issues is a recipe for much bigger, more expensive problems later on. The moment you see signs of structural distress, it's time to put down the tools and pick up the phone.
Crucial Insight: A pro brings more than just sealant and tools; they bring diagnostic equipment and years of experience. They can tell you if a crack is just a simple leak or a symptom of a much bigger problem, like foundation settlement or bowing walls.
Here are the dead giveaways that you need to call a professional in the Greater Toronto Area:
The price difference between a DIY kit and a professional service reflects this massive gap in expertise and scope. A DIY attempt might set you back a couple hundred dollars, but a professional investment is justified by the complexity and risk involved. As detailed on resources like Angi.com, professional pricing reflects the true value of getting the job done right the first time, ensuring your home is safe and sound.
Facing a leaky foundation repair can feel like a huge, unexpected hit to your wallet. It’s one of those homeowner problems nobody wants, especially when you start thinking about the cost. In the Greater Toronto Area, the final bill isn't just one simple number; it's a sum of several moving parts.
To put together a realistic budget, you first need to get a handle on what drives the price up or down. The biggest factor, by far, is the scope of the project. A quick interior injection for a single, hairline crack is a world away from a full-scale exterior excavation that involves digging up your entire front garden. The size of the repair, how deep we have to dig, and even how easy it is to get equipment to the site all play a massive role in the final quote.
When a contractor comes out to give you an estimate, they're not just pulling a number out of thin air. They're sizing up a bunch of variables unique to your home and property. Don't be surprised if quotes vary—it all comes down to the complexity and the labour involved.
Here’s a breakdown of what really impacts the cost in the GTA:
Good news for most minor jobs: if you just need a simple crack injection, you likely won't have to worry about city permits.
However, if the repair involves any structural work—like fixing bowing walls or addressing major settling issues—you will absolutely need a building permit from the City of Toronto. This is not a step you want to skip. Working without a permit can lead to huge fines, stop-work orders, and a massive headache when it comes time to sell your house.
A reputable contractor will handle the entire permit application for you, which usually means submitting engineered drawings for the city's approval.
Important Note: In Toronto, permit fees are based on the total value of the construction project. The minimum fee for projects involving structural work is $198.97. Make sure this is factored into your overall budget.
To make sure you're getting a fair price for quality work, it's always a good idea to get quotes from a few different reputable, local companies. A proper quote should be detailed, breaking down the costs for materials, labour, and any permit fees. That transparency is key—it helps you compare apples to apples so you know exactly what you’re paying for.
When you're looking at different quotes, don't just jump at the lowest number. Pay close attention to the proposed repair method, the quality of materials they plan to use, and the warranty they offer. Sometimes, paying a little more for a robust, long-term solution is a much smarter investment than a cheap patch-up that’s just going to fail again in a couple of years.
To see how these types of repairs are covered, you can learn more about our comprehensive waterproofing and foundation repair solutions.
It can also be helpful to see how costs are structured in other places to understand the industry standards. Experts like This Old House show that the main cost drivers—labour, materials, and permits—are pretty consistent across major cities. Arming yourself with this kind of knowledge will help you create a solid budget and tackle your foundation repair with confidence.
Even after getting the rundown on causes and costs, you probably still have a few questions buzzing around. That’s completely normal. When homeowners across Toronto face a leaky foundation, the same concerns pop up again and again. Let's get you some straight answers to the most common ones.
This is about more than just slapping a patch on a crack—it’s about protecting your home’s value and your peace of mind for the long haul. Having clear, practical info is the first step to making a smart call for your property.
The timeline for a foundation fix can swing wildly depending on the method we use. It's a critical difference to understand because it affects everything from how much your daily life is disrupted to how you plan the project.
For example, an interior repair is usually a quick, surgical procedure. A pro can typically handle a polyurethane or epoxy injection for a single crack in just a few hours. Minimal mess, minimal fuss, and you can get back to your routine right away.
On the other hand, an exterior repair is a much bigger deal. It's a full-on construction project that unfolds over several days and involves a few key stages:
All things considered, you should budget for an exterior waterproofing job in the GTA to take anywhere from three to five days. Things like the scale of the project, unpredictable weather, and site accessibility can all nudge that timeline.
This is the big one, and unfortunately, the answer usually isn't what homeowners want to hear. The vast majority of standard Canadian home insurance policies do not cover foundation leaks caused by gradual issues like water seepage, hydrostatic pressure, or the house settling over time. Insurers almost always classify these problems as regular home maintenance responsibilities.
But there are a few exceptions. If the leak is a direct result of something sudden and accidental, you might be in luck. The classic example is a pipe bursting right next to the foundation, causing a flood of water damage. In a scenario like that, the resulting damage could be covered.
Your best bet is to pull out your policy documents and read the fine print. Some providers offer optional add-ons for "overland water" (flooding from heavy rain or snowmelt) or sewer backup that could provide some coverage, but this is never standard and has to be added specifically.
The ideal timing for your project really hinges on the type of repair you need. The good news is that some solutions aren't at the mercy of the Toronto seasons.
Interior repairs, like crack injections, can be done effectively any time of year. Since all the work happens inside your basement, we don't have to worry about what the weather is doing outside. This makes it the perfect fix for urgent leaks that show up in the dead of a Toronto winter.
For exterior repairs that involve digging, timing is everything. The prime window for this kind of work in our area is during the drier, warmer months. Late spring, summer, and early fall are perfect because the ground isn’t frozen solid, which makes excavation much easier, faster, and more affordable.
Plus, dry weather is crucial for making sure the waterproofing membranes cure properly. A solid cure is what creates that tough, long-lasting seal that will protect your foundation for years to come.
If you're dealing with a leaky foundation in the Greater Toronto Area, you don't have to figure it out on your own. The expert team at Joey's Landscaping specializes in both interior and exterior waterproofing and foundation repair solutions designed to protect your home. Contact us today for a free, no-obligation consultation and let us help you find the right fix for your property.